There is much to do before we receive our new MultiCam CNC plasma cutter including building some new shop space to house it. But we’ll get started on that next week. This week we are still dreaming up our first project for the new machine. I believe I know what it will be but I’m not quite ready to spill those beans yet.
I thought it might be cool to show an imaginative plasma cut project we did a number of years ago. It was the desk for our local MultiCam dealer. I remember the excitement as I watched an automated plasma cutter for the first time…. Here’s a post I did back then…
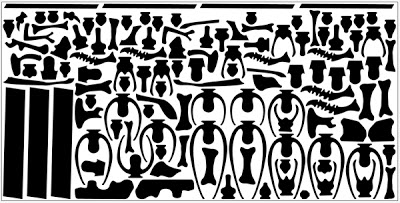
For the upstairs office it was time to go way back into history. This room would showcase the MultiCam Plasma Cutter as well as the CNC router. All the files would be created using EnRoute including their just released plasma cutting software. I located a plastic T-rex model kit online and then downloaded the detailed instructions. Those instructional photos gave me the information I needed to build the files for the individual bones. There were a bunch! I knew the height of the desk and simply scaled everything up to that size. Amazingly they nested on one sheet of 4′ x 8′ x 1/2″ thick steel. The plasma cutting file was generated using the brand new EnRoute Fab software. Since I don’t have a plasma cutter nor the new software Jeff Hartman was kind enough to generate the files for me.
To present the concept to my client I used the component file of the pieces to create this drawing. It was all that was required to sell the project. From here on in we would wing it, designing as I built.
The steel was cut using a factory fresh 3000 series MultiCam CNC plasma cutter, still on the showroom floor. I watched in amazement as it sliced through the heavy steel like butter with perfect precision. As the machine cut I removed the pieces, wearing gloves of course for they were very warm.
I ended up with 312 pounds of dinosaur pieces. They filled the trunk of my small rental car pretty good. and weighed it down in a significant fashion but I made it home safely with the dino bones tucked away in the back.
Since it had been better than a year since I had designed the dino desk, I wondered if I would remember how it was supposed to go together. It was quite the pile of parts! But after I had sorted them and arranged them in order of size it came back to me how it was supposed to go back together. I printed out the plastic kit directions just to be sure but ended up not using them.
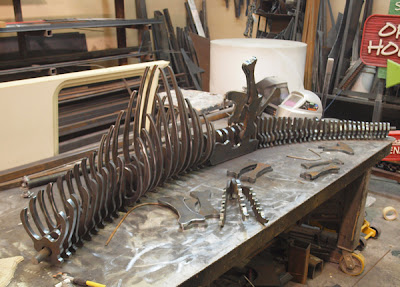
I went through my scrap bin and found a 1″ steel rod that was the perfect length. I put it though our hydraulic press to bend it to the right shape then arranged the plasma cut parts over the rod and began the welding. The easiest way to align the parts was to build the dino flat on his back.
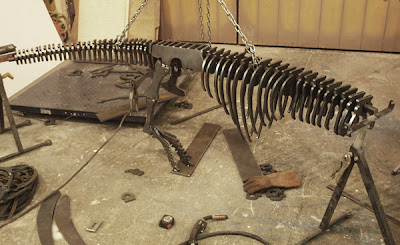
Once the rib cage and tail of the T-rex were welded up I used the chain hoist to lift it into the upright position. An adjustable stand at each end held things steady while I did my measurements and lined things up. From here on in I would weld up the various smaller assemblies on the bench and then fasten them to the large piece permanently. It came together pretty quick!
There is still a little grinding to do and I have to figure out and source a way to fasten the tempered glass plate to the top but it is pretty much together in only a couple of hours. It’s a desk like no other! The desk will dramatically display the awesome cutting abilities of the MultiCam 3000 series plasma cutter using the new EnRoute Fab software.
Here’s 25 seconds of the cutting process for your viewing pleasure…
Once again I had pushed the boundaries of our experience. As I worked on the dino desk my mind was racing, thinking of all the things now possible.
Here’s a pic of the finished desk…
That was the very first project five years ago… imagine what we are thinking now…
-dan
Published with permission from precisionboard.blogspot.com. Source.


