Synergy Sign and Graphics Blog

VariEze N388DT – Fuselage Refinishing

VariEze N388DT – Fuselage Refinishing

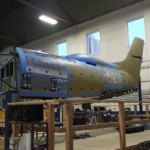
I’m back from vacation!  Had a very nice time, but I’m happy to be back in the States, and working away on some cool projects.  James has been working on scraping all the old paint and fill off of the VariEze.  The paint is Imron, which has been holding up quite nicely, but the fill used by the builder was Featherfill, which in some spots is practically exploding off the airframe.  It’s only further cementing my opinion that polyester based products have no place whatsoever on aircraft.  It’s not a matter of if they break down, only when.  Here’s some pics: Do you know what tomorrow is?  It’s the one year anniversary of the launch of this blog!  And I’m cooking up a very special post to celebrate the occasion!  Stay tuned…..
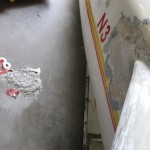
read more
Gone Trekking – On Vacation April 1 to April 19

Gone Trekking – On Vacation April 1 to April 19

Things are going to get a little musty and dusty around here for a few weeks, because tomorrow morning I’m on a plane heading for Nepal, for three weeks of much needed vacation.  I’ll have very limited access to email, and no phone/voicemail access at all.  So, if you need anything, please contact James Jorgensen at 707-292-6756 or via email – james@schoolstreetdesign.com.  I’ll try my best not to get eaten by a snow yeti…. -Sky

read more
Fun with MAXshot/EXAscan – Digitizing “The Racer” Fuselage

Fun with MAXshot/EXAscan – Digitizing “The Racer” Fuselage

Last week we were up in Reno, doing among other things, a digitization of a plane that is simply called “The Racer.”  The Racer is an as of yet unfinished Unlimited Reno racer.  It’s pretty much the smallest plane you can build around a Wright R-3350 , which is still a pretty big plane.  The Racer is the brain child of Dave Cornell, the current crew chief of Rare Bear.  It’s been a 23 year, on again, off again labor of love, and now it most definitely seems to be on again.  We’ll be doing a whole range of projects on The Racer, starting with a new canopy plug.  The current canopy doesn’t come down far enough, and so a new plug needs to be made.  Rather than do it by hand, we’re going to take the scanned data, create a perfected T-Spline surface and then CNC machine a new plug.  After that we’ll be re-lofting the aft bottom fuselage, and making all new form blocks.  Then maybe some cowling ducts.  And some canopy skirts and frame.   And drag strut braces.  You get the idea – there’s a whole host of projects we’ll be working on, which is great, cause this thing is really, truly cool. The fuselage digitizing was our first real chance to use the new MAXshot photogrammetry setup.  I’m happy to report that the MAXshot worked flawlessly.  The through process is very much the same to using the EXAscan, but covers a much larger area more quickly, and more accurately.  Here’s some pics from the scanning process: Here’s a screen shot of the capture session for the right side of the fuselage: For the straight lofted panels we just scanned the perimeter – no need to scan every square inch when you can get all the data you need from the edges.  James will be up in Reno again this coming week to scan the wings.  We’re really excited to be working on such a cool project!

read more
T-Splines Tip – Panel Line Breaks

T-Splines Tip – Panel Line Breaks

I figured I would do a quick little step by step on making panel line breaks with T-Splines.  The first thing is to make sure that you have an isocurve, or isocurve loop that follows the panel line break that you want.  This sometimes can be tricky – in the case of this windshield, I did the topology layout with this in mind.  Here’s the loop of isocurves that I want to form the break on – it’s the junction between the main body and the front windshield: Now just run tsBevel, the options I use for something like this are: Segments = 5, Positioning = Distance, Keep on Face = Yes, Retopo Snap = No.  You’ll need to play around a bit with the bevel distance, in this case I found that 0.09 worked nicely, but you’ll have to adjust it for each model, depending on size.  Here’s what you get: Now select the middle face loop , and set your drag mode to UVN: Now just push that face loop inwards using the normal (blue) arrow.  I like to do it numerically, so that I can make them consistent.  I used a value of -0.05 here, but again you’ll have to play around a bit for each application. Now just run tsMakeUniform.  You should do this after every change in topology.  In smooth mode you get this: It’s quick, it’s easy and it looks good.  Can’t beat that!      

read more