Dan Sawatzky’s Blog

Double sign tree complete

Double sign tree complete

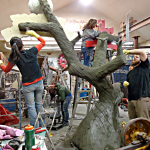
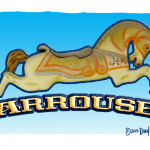
The double sign tree took a while to do because the sculpting and painting were fit around the many other projects underway in the shop. Jenessa did the sculpting and painting on the balloon sign and did a great job too! Amazingly, this was only the second sculpture she has done. Hailey called first dibs on painting the carousel horse. Every color got three coats – all hand painted. That’s a lot of skilled cutting! The horse turned out great! Once the signs and tree were all painted up they looked pretty cool! The piece will go outside next week, ready for delivery and installation right after New Years.
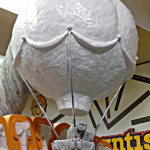
read more
Slicing and dicing (Creating a 3D logo PART TWO)

Slicing and dicing (Creating a 3D logo PART TWO)

With the relief creed and sliced it was time to hollow out each section. It’s not hard but it does have to be done in a particular order. First I created an oval inside each section, making sure the border width took into account the slope of the side of the piece. I did this by selecting the new oval vector and then hitting render what I could see the slopes as they related to the size of the oval. I then selected all of the oval vectors and made them into zero height reliefs

read more
Putting a skin on the tree

Putting a skin on the tree

With the routed signs securely mounted to the tree and the armature all prepared, today was the time to begin the application of the fiberglass reinforced concrete. It was carefully layered on and then allowed to set until it was perfect for carving. Then our skilled carvers began their work of transforming it into a gnarly and twisted tree.

read more
Mounting the signs to the tree

Mounting the signs to the tree

In a previous post I showed how I added the steel structure into the routed horse. Two 5/8″ thick steel rods protruded out of the back. These would then be welded into the sculpted tree structure making for a very strong but almost invisible mount for the signs. Here’s the concept drawing used to sell the idea to the client.

read more
Creating the Balloon Adventure sign file

Creating the Balloon Adventure sign file

The Balloon Adventure sign looks simple but there were a bunch of steps to create the routing file. The bottom section of the song was pretty standard. As always I started with the lettering vectors. I created these in Illustrator and then imported them into  EnRoute  where the rest of the file creation would take place

read more
Putting bones in the horse

Putting bones in the horse

Precision Board is strong stuff, especially the 30 lb board, but it is not structural. There are plenty of ways to add structure to a sign but my favorite method is to weld up a steel frame and then laminate it into the sign layers with only the mounting points sticking out when we are done. Doing it this way means there are no screws to let go, and limited ways we can get corrosion.

read more
Galloping along

Galloping along

We were originally going to make the carousel sign include a half of a real carousel horse that I had salvaged a number of years ago. But as we got into the build of the park the space where were going to put the sign it was decided that the space will now be shared with the balloon adventure sign. (I’ll post that entry tomorrow) The redesign of the positioning of the signs meant we had to take another look at the sign design too. I dud a search online and came up with a beautiful STL mesh file of a carousel horse. Buying this mesh file would save many hours of modeling

read more
Rolling along

Rolling along

The wagon wheel was created in  EnRoute  and routed in five layers which will be glued up afterwards. Because of this I created copies of various parts of the files as I went. I also created each element separately and then merged them afterwards. I started with the spokes of the wheels which were created with the dome tool

read more