How to Reduce CNC Machining Time in Soft Tooling

Smart and Easy Soft Tooling with Precision Board Bonded Blocks

Custom bonded blocks can be a game-changing asset for any soft tooling application. Order a professionally bonded custom block, and have it arrive fully bonded and ready for machining- this is a huge CNC time-saving benefit. Our custom bonded blocks allow you to save significant machining time, as you only need to machine minimal excess material, rather than machining an entire block down to size. See the diagram below:


ReverseStepToolsFinal

As you can see, the savings in CNC machining time and material when using Precision Board custom blocks are substantial. Additionally, our fabricating capabilities go way beyond simple stepped designs. We’re experts at planning a material utilization strategy that is unique to your specific project, no matter how complex. All we need is a dimensional sketch of the finished tool, and we’ll take it quickly from there to prepare a quote. As you can see in the video above, our skilled production team is able to create large, highly complex tooling blocks from scratch. And thanks to our large inventory and highly skilled production team, we can create blocks of any size, any shape, and any density. Plus, we move fast!

soft tooling packaged

Precision Board custom bonded block ready to ship

After the custom tooling block is fabricated, it undergoes a careful packaging process to ensure it arrives intact. We use sacrifice sheets, reinforced edge protectors, a custom-sized pallet, and yards of plastic wrap and bindings to protect the block and secure it for shipping. You can rest assured that your Precision Board custom block will arrive undamaged and ready for machining.

So give us a call or email today to find out more about our custom tooling block capabilities, or request a quote for a custom block of your own. We’re here to help!

When Steampunk meets Polynesian

The past few months I have been learning new things pretty much daily and the past few weeks I have been tasked on learning the machines on the vinyl side of the business.

As the illustrator/designer at the shop I am often given challenges or tasked to come up with ideas frequently. Jim loves to give me the most curve ball concepts to work with. From camel camp signs to robot repair men, so when Jim came up with this newest challenge I wasn’t shocked it be somewhere from left field.

Jim sit across from me a the shop, makes to easy to collaborate and bounce ideas off one another. One morning Jim calls over to me “Hey, Aubrey when you find yourself with a minute try drawing up some steampunk tikis.” I looked at him and tilted my head thinking to myself “What in the world?” Naturally, I did what I always do when Jim wants me to draw up something. I nodded and replied “yeah sure.”

Meanwhile, I secretly Googled and typed in steampunk tikis and nothing came up…  rats!

Challenge-accepted

I started looking at traditional tikis and thought of things that are common in steampunk designs, the ideas started to swirl and well Ta Dah I passed Jim’s challenge.

1 2 3 4


-Aubrey

Published with permission from Synergy Sign & Graphics. Source.

The Sign Invitational

A while back, a brainstorming session involving Dan & Peter Sawatzky, Jeff Hartman, and Myself, yielded one of the better ideas I have heard in a long time.

The Sign Invitational was born. The contest is simple. Set up some build rules that govern theme and size, then invite 20 amazing sign makers to participate in the challenge.

The registration deadline passed on October 31st and I’m proud to say we have 14 amazing sign makers competing.

The most amazing thing about the contest is everyone who competes has to show their sign at the ISA Expo 2016 in April. I’m excited just to meet many of these people and look at all the creations. One sign maker is traveling all the way from Germany!!!

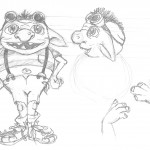
Here is a quick sketch of a character that will be used in our creation.

Exciting times!!!!

the TrollVincis

-Jim

Published with permission from Synergy Sign & Graphics. Source.

Drilling for an Eye-bolt

Drilling holes in Precision Board has many similarities to wood. However, there are some differences that should be noted. This blog will feature step one of two for hanging a sign using an eye-bolt. Here is a step-by-step picture and video guide to show you how to drill a proper hole in Precision Board to hang from an eye-bolt.

  1. Measure the eye-bolt.

IMG_1103

  1. Mark the spade drill bit for the length of your eye-bolt, PLUS ¼ of an inch.

IMG_1105

  1. Mark the drill bit for a stopping point reference.

IMG_1109

  1. Measure and mark equidistant cross hatches for accurate drilling points.

IMG_1114 IMG_1116

IMG_1117

  1. Drill into the Precision Board ensuring your drill is straight and accurate down to the mark on your drill bit.

IMG_1119 IMG_1121

IMG_1123

https://www.youtube.com/watch?v=2wh8ECrUt4M

  1. Clear away chips and enjoy your finished product!

IMG_1124 IMG_1126

Stay tuned next week to find out how to insert the eye-bolt using our two-part epoxy.

To learn more about Precision Board’s strength, check out the testing completed by West System epoxy.

Our CNC Machine Finally Arrived…

Xpressive graphiX has created another stunning sign and has been chosen to be “Today’s Guest Blogger.” Tony Rose, Business Partner & Creative Director, with Xpressive graphiX writes the following

Lock 9 Pizza a new business located in Duncan Falls, Ohio, came to us because they had seen several signs of ours around town. In particular, The Olde Falls Inn, that was featured on Coastal Enterprises blog a few years ago and was a winner in the Signs of the Times Magazine 2014 contest last year.

Up until this sign, all of our 3D projects had been hand made, and only certain parts were outsourced to be machined. We finally built up enough 3D business to have a Multicam 1000 CNC installed, and this sign is the very first project we machined with it. In fact, to meet the deadline, we jumped in with both feet and started machining the parts for this sign the first day our machine was installed! Nothing like the rush of throwing a $400 sheet of material onto a machine we had never used!

Typically we hand carve Precision Board Plus which gives us a 3-4 week turnaround time. But, thanks to our new CNC, it only took 7-days (without working overtime)!  What a drastic difference it has made!

It worked flawlessly, considering I had never used Multicam or EnRoute Software before this project. I quickly understood the basics of EnRoute and by following the steps on Dan Sawatzy’s Blog I also learned other 3D techniques.

 IMG_1289

This sign measures 12” x 4’ x 8’ and is made from 2” PBLT-18 to get that awesome 3D look. We then glued SIX different sizes and shaped layers onto a steel internal frame using PB Bond 240 adhesive and finished it off with locally sourced PPG exterior latex paints and glazes, which we mixed ourselves.

IMG_1293

We have been using Precision Board Plus for the past 3 years and love how easy it is to work with. For this project in particular, we were blown away on how effortlessly it machined along with the quality of the results and the effects Precision Board can achieve.

IMG_1292 IMG_1305 IMG_1330 IMG_1336

Most importantly our customer was very impressed with the detail and quality of the sign! She loved the results so much that additional Precision Board signs were requested, instead of the traditional aluminum and vinyl for their parking and directional signs.

IMG_1348 IMG_1353


CECSlogan5

Request your free sample today, by simply clicking here!

Or for more information call us at 800-845-0745 and one of our Sales Reps will be happy to assist you.


Answering the call.

Here at the shop, we receive requests for sponsorships and donations more often than we can keep track of. Most of the time, we end up donating something, or buying an ad in a program and forgetting what it was even about. From time to time, there is a request that really pulls at my heartstrings and I decide to do everything I can to help people out.

Continue reading here:
Answering the call.