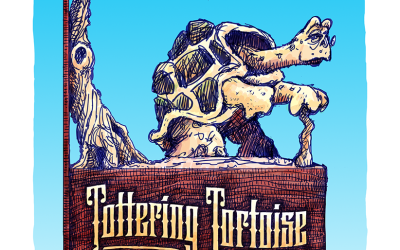
Dan Sawatzky and The Tottering Tortoise

We love using Precision Board in our shop to create unique dimensional signs and we go through literally tons of it each year. Precision Board is versatile and easy to work with as it accepts almost any finish and is durable over the long haul. Even so, it is rare that we only use Precision Board to make our creations as it’s often combined with other materials, a recent pub sign project is a good example of this.

The pub sign is a sample piece that hangs in our studio. The name of the fictional enterprise is Tottering Tortoise and we decided to add the 1954 date to ensure some history (1954 happens to be my birth year). We have more than 150 such samples of dimensional signs on display in our studio. These samples allow us to experiment with new methods and materials and build our skills, but most importantly, they help us sell a tremendous amount of quality work. This sign has already proved its investment by selling a large new project with similar signs.

The first order of business was to create the concept art. The concept art allows us to work out the bugs of a new design. These drawings are quick and easy, done in a loose style that allows plenty of room for interpretation as we build. This was accomplished by freehand using an iPad as a digital drawing surface and Adobe Photoshop as the program. 

Typically, when creating a project for a client, I produce a second drawing with more information on it such as measurements and notes which is pictured above. I wanted to replicate my normal process in case anyone has questions on this specific project.

I then produced the needed lettering vectors using Adobe Illustrator before importing the file into EnRoute Pro to generate the CNC routing files. This drawing is tight and not changeable (the client never sees this portion of the artwork).

We created two identical routed panels on our MultiCam CNC router from 1.5” thick PBLT-25 Precision Board. A centrepiece was also created with a hole in it to accept the horizontal square tubing frame. We welded that to the steel mounting plate, which was attached to the wall. The two sides and the centre were laminated together using Coastal Enterprises PB Fast Set glue, then clamped until they were cured. This is a glue we love as it is one-part and sets in less than an hour.

We then welded a steel armature for the tortoise and the tree using 1/4” steel pencil rod. It is easily formed by hand and then welded together. 1/4” holes were drilled into the Precision Board sign for the steel rod to be glued into. We used Sculpting Epoxy to first form the tree and then sculpt the tortoise.  Additional final textures were added by pressing crumpled tin foil onto the surface. 

Next, we welded scores of plasma cut steel leaves to the branches of the tree. While it looks complex, the sculpture is relatively simple. I find sculptures with a lot of character and age much easier than most.

We applied three coats of base color (acrylic house paint) and then a series of glazes to bring out the texture and detail. After each glaze color was applied, much of it was wiped off with a soft towel.

Since the tortoise was the most complicated and the messiest part of the painting, we did this first, then masked him off to do the balance of the painting. Once the min part of the tortoise was finished I went back and added the details such as the eyes.

The finished sign featured 23k gold leaf letters for some extra bling. The combined materials of Precision Board, steel and epoxy work together to create a very strong and durable sign. The detail in each part is superb. Unless you touch the sign, it is almost impossible to tell which part is made from which material. That is the way the components of a sign should work together!

Rotary CNC Routing of Precision Board Faux Statues

Coastal Enterprises, manufacturers of Precision Board HDU, is proud to announce a series of guest blogs written by Dan Sawatzky of Imagination Corporation, which will be posted on the Precision Board Blog each month. This month Dan Sawatzky shows us how he used their rotary CNC machine to route some faux statues from Precision Board HDU and walks us through making adjustments to get the best final product.  These statues will be part of the themed decorations at The Hazelnut Inn next door to Imagination Corporation’s studio.

In Dan’s own words…

We’ve had our rotary CNC MultiCam router since late in 2013. When we first took delivery of the wonderful machine we did a few projects with it but the task of programming the machine was cumbersome (for me) because it involved writing some G-code to run on the router. It was much too complex for my artistic brain – especially since I only used it occasionally. After those first few test projects the router hasn’t been used.

Thankfully, since that time, the good folks at EnRoute software have made things a whole lot simpler. Our good friend Jeff Hartman, one of the program’s authors, came up for our last workshop a couple of weeks ago and stayed afterwards for a couple of days for some one-on-one training with the new and improved software. By the time he left we felt confident we could put our rotary CNC to good use.

Being Sawatzkys, we jumped right into the deep end, of course. Peter has been itching to start work on the two ship figureheads that are to be mounted over the bed in the North Star suite of the Hazelnut Inn. He downloaded a customized STL file of a figure which would be the starting point for the figureheads. Two mirror images will be created, and once he adds the final details, they will be differently-clothed sisters.

Peter laminated up two massive blocks of PBLT-30 Precision Board, two feet in diameter and five feet long. It took the considerable effort of four of our crew to lug the blocks into the router room and chuck them into the router. Then it was the moment of truth…

We knew we would have a significant learning curve with this project and so we kept a careful eye on the process, pausing the router to make adjustments by hand as needed. The block was first routed into a perfectly round cylinder, then the actual routing process began – ten passes of one inch each. The first three passes were flawless… and then that pesky ‘CONE OF DEATH’ reared its head. This ‘cone of death’ is determined by the length of the bit and the size of the collet. We were using as long a bit as we possibly could, but because the block was close to the gantry we couldn’t use anything longer. To remedy the situation we brought out the disc sander and air power die grinder. As the collet approached the material we would remove as much as we needed to continue, knowing we would have to add it back in by hand later with sculpting epoxy. Most of the material we removed was towards the rear of the figure which will not be a problem.

The first figure turned out great (for a first effort), but while the machine ran we figured out some quick solutions. As Peter prepared the second mirrored figure he made a few modifications in the EnRoute software. He added some mesh ‘balloons’ to fill the problem areas, primarily between the arms and body as well as between the legs. These areas will be covered with clothing when he hand sculpts in any case. We also increased the size of the bit and decreased the overlap on the rough passes. This cut our routing time substantially. The second figure routing went immeasurably better and we only had to remove a touch of material using the hand grinder to make room for the collet. The finish pass cleaned things up nicely.

rotary cnc

On the second figure we were also relaxed enough to grab some video for the blog. We hope you find it as exciting as we did.


The figure on the left is the first one and the grinding efforts to remove material to make room for the CNC collet are visible on the backs of the arms and hips. These areas will be filled in later by hand using sculpting epoxy. The second figure after digital modification needed almost no hand adjusting. Both figures will receive a thin layer of sculpting epoxy to add details, woodgrain and clothing to make them look like weathered, hand rotary-crafted figureheads of old.

You can bet we are busy dreaming up more projects to rout using this exciting rotary CNC tool!

rotary cnc

Sawatzky’s Imagination Corporation is a small family company that specializes in the design and creation of dimensional signs and environments. They tackle projects of any size from small signs to entire theme parks. Their work has garnered numerous national and international awards.

Dan Sawatzky is best described as a creative force and visual storyteller extraordinaire. His art career spans almost fifty years of magic. Dan’s passion is to design and create imaginative places that take people from the normal world to a setting of delight and wonder.

Coastal Enterprises manufactures Precision Board HDU, a versatile, cost-effective and eco-friendly urethane sign material that is particularly effective for making professional-looking indoor and outdoor dimensional signs.  It is a closed-cell rigid substrate that does not rot, warp or crack.  You can request free samplesget a quote or sign up for periodic newsletters packed with helpful information.

Making 3D Art from Urethane Foam

Kevin Langmaack is an art instructor at Central Valley Christian School.  He teaches a 3D foam carving art class to high school students.  They learn about creating realistic objects through carving high-density urethane foam.  Langmaack talks about the concepts behind the class and why he loves using Precision Board HDU in his popular foam carving class.

urethane foam

“I’m the only art teacher at the school and so it was up to me to create a program,” says Kevin Langmaack.  He created a 3d art class that is taken by mostly sophomores and juniors.

He says, “in that class half of it is clay and pottery wheel and the other half is other sculpture techniques.”

Kevin used soapstone and alabaster in college, but thought it would be too much for this class.  He had tried a few things on the market and finally landed on HDU.  He says it’s the same skills and techniques that famous artists use to carve marble, but it’s a little more accessible to teens.

“Students have one project in 3d art class. Artifact carving is what I call it.”  Langmaack continues, “the assignment is working through the idea of Trompe L’eoil…artists that make things that look like something else.”  He will give them a small piece or scrap of Precision Board HDU to play with for a few days to get used to using the material.  It helps give them an idea of how fast you can take pieces off and how the material responds.

According to Kevin, artists used to take marble and carve life-like people. Later on, they used marble to carve every day objects.  He points to artist Jud Nelson, known for super realistic carving of every day objects like garbage bags or cereal or bread, using marble and polystyrene as his materials of choice.  Kevin tells his students, “now it’s your turn. I want you to carve an item that looks like the real thing and trick people.”  He adds, “if you’re not sure what to carve, then do an office product…stapler, scissors. Or maybe use food…hamburger, fries.  Something you might find in your locker. It’s a different theme each year.”

With this project, Langmaack says it’s the idea of reduction instead of addition.  “What do you need to take away so that the object you want is there? Removing the unnecessary stuff to reveal the object.”  He continues, “if you’re going to carve a strawberry with leaves, what am I going to take out? Visualize what needs to happen.”

Kevin will have his students sketch their idea out and then even draw the object right onto three sides of the urethane foam.

Being a small school and lacking a CNC machine, he has his students use hand-carving tools.  “They use rasps for most of the work. Hand saws for larger areas. Exacto knives for detail work and then sandpaper to smooth the edges.”

Langmaack mostly has his students use acrylic paint, but sometimes they need their project to look shiny, so then they will spray it with gloss.

One of the lessons Kevin is trying to teach with this class is the idea of subtracting rather than adding.  “Clay is different in that you’re being additive…adding to it to make something. The paradigm shift is the idea of subtracting rather than adding.  Some kids pick it up right away and some take a bit longer to understand how to take things away.”  He continues, “it’s fun because all the other projects you draw a plan and then build until you get there and then you see it when it’s done. I have them bring the real object with them so they can see how the final product looks. With this you can’t change your mind because you’re removing urethane foam to get to your final shape. You can’t just add more material and change your idea.”

Before students pick out an object, Langmaack tells them that something organic is a lot easier than something man-made. Something perfectly round, like a perfume bottle, is very hard to make perfect. Something like a cupcake doesn’t have to be perfectly round.


This is the 7th year that Kevin has been using Precision Board HDU. “I’m very thankful that the product exists. There are some other options on the market and other ways to teach the same concept, but I really enjoy having access to this product.”

Langmaack adds, “many kids want to take the class specifically because they are excited to work with the material and have seen other projects in the past.”

We can’t wait to see what this year’s theme will be and even more excited to see what wonderful creations the kids make from Precision Board high-density urethane foam!

urethane foam

Kevin Langmaack has been an art teacher in Minnesota and California for 20 years and has recently achieved his National Board Certification. Besides teaching, Kevin is a husband and a father and an artist.  Kevin is an instructor in the Visual Arts Department at Central Valley Christian School.

Coastal Enterprises manufactures Precision Board HDU, a versatile, cost-effective and eco-friendly urethane sign material that is particularly effective for making professional-looking indoor and outdoor dimensional signs.  It is a closed-cell rigid substrate that does not rot, warp or crack.  You can request free samplesget a quote or sign up for periodic newsletters packed with helpful information.

Learn more about our school donation program and view a list of donation recipients from around the country.

Orange Coast College Students Sculpting the Future with Precision Board

The students at Orange Coast College in Costa Mesa, California, are creating sculptures using Precision Board High-Density Urethane.  It’s all part of Leland Means’ sculpture class.  He’s exposing the kids to materials they may use in the professional world and empowering them to expand their skill sets.  Coastal Enterprises provides Precision Board to universities around the country as part of our donation program.  Our goal is to support the next generation of engineers, artists, architects and designers so they can take the craft to the next level, just like these students at Orange Coast College are doing.

orange coast college

The assignments for Leland’s 3D design class include enlarging everyday objects and creating electric guitar prototypes.

“It has been a real boon for our students to use a material that they may encounter in the professional world and an empowering experience to be able to create convincing objects using their skill sets.

Chuck Miller, President of Coastal Enterprises adds, “you can tell by the looks on their faces that these students are incredibly proud of their work, as they should be.”

You can view a gallery of past and present student projects created using Precision Board HDU below.

[Best_Wordpress_Gallery id=”26″ gal_title=”OCC Students”]

Orange Coast College‘s 164-acre campus is located in Costa Mesa just minutes from Southern California’s beautiful beaches. Founded in 1947, with classes beginning in 1948, OCC has grown into one of the nation’s largest — and finest — community colleges, enrolling more than 25,000 students each semester.

Orange Coast College features exceptional facilities and the latest in technology and offers more than 135 academic and career programs, including one of the nation’s largest and most acclaimed public nautical programs. Nearly half the students on campus are enrolled in one of OCC’s Career and Technical Education programs.

Coastal Enterprises manufactures Precision Board HDU, a high-density urethane material used extensively in the tooling industry.  It is a closed-cell rigid material that does not rot, warp or crack.

Coastal has a long tradition of donating Precision Board HDU to schools around the country in support of the next generation of engineers, designers and artists working in composites.  If you are interested in finding out more about our Precision Board school donation program, check out our School Donation page and get in touch with us to see how we can help your program out.

Creating an Architectural Gable with Precision Board HDU

When Shane Durnford created an architectural gable for a home, he used Precision Board HDU and hand-carved the incredible detail into it. For him it was a return to sign work & he couldn’t be happier about it. Shane talks about bringing this work of art to life through craftsmanship, skill and the use of Precision Board HDU.

gable

Durnford was a sign writer in the 80s doing lettering and specialized in handcrafted signs. He taught himself how to carve in 1989 and it took on a life of its own from there.  Over the next 20 years Shane created thousands of premium carved and crafted signs for commercial, municipal and residential commissions.  After taking a break from carving and sign work, Shane recently had the opportunity to create an architectural gable from some PBLT-18 Precision Board HDU and jumped at the chance.

“This was my return to sign work and hand carving. It never left me. As soon as I picked up the tools, it came back to me,” Shane says. “It’s fun. I missed the craft.”

It took him about 100 hours altogether for the design and carving of the gable. He started with a flat piece that had the general shapes in it and then worked from there to carve dimension into the substrate.  “The 18 lb. Precision Board sheet was only about four inches thick, so I used shadow to give it a bigger look,” Shane says. “I start with a low point and high point for reference and then bring the picture into focus by shading with light and undercutting to give the substrate dimension,” he added.

Almost all of Shane’s work has birds in it. “They are poetically beautiful creatures.” he says.  “Almost everything I do is nature oriented and organic in shape and line. I think living in the beautiful countryside where I had my studio for years had a great influence on my work. It’s the place where my muses live.”

Because the bird’s wing on the right side of the gable was only about an inch thick, he drilled a ¼” brass rod through the bird and into the wing to give it strong support.  Durnford then used Benjamin Moore primer and latex paint with an eggshell finish.  He says, “I thought about painting the apples red, but it would visually clutter the sign and be a distraction to the entire architectural nature of the sign. More of a gable architectural feature instead of a sign.”

Pro Tip: “When carving, take it one section at a time. Pick your highest and lowest depths and establish those areas and then carve the remaining elements in relation to those two points. The detail comes at the very end, like a picture coming into focus.  Design and carve by feel and intuition and try not to over think the process. It’s like sketching. Rough it out and establish the over all composition, and then refine the detail. The learning curve is always steep and never ending. That’s what I love about it.”

Shane likes the feeling he gets when hand-carving high-density urethane.  “It’s a meditative and natural process. When I carve, I try to work intuitively. The carving pulls you inside the work and time passes effortlessly. You forget yourself and let the design find you.”

We asked him how he knows when a particular carving is finished.  “It depends on the piece. For exterior pieces I limited the detail, since it will be viewed at a distance. For more interior pieces the extra refinement adds to the intimacy and expression of the piece.”

gable

Shane prefers to work with Precision Board HDU because there’s no grain or knots and has a nice consistent density.  He says, “no matter where you are on the material, it’s all the same consistency. It helps the carving, so you don’t have to adjust your work for the material.  I’ve used other sign materials and they don’t hold the edge like Precision Board does. The tools get along well with it.”   He adds, “I like the natural color too.  It’s a little thing, but it affects the mindset when carving.”

Durnford elaborates a bit more on his style.  “I approach the work as a designer rather than just a carver. The sign design criteria easily translates to interior architectural pieces like entranceways,  newel posts, mantels.  I think the key is to feel it when designing and carving. It makes for an authentic and honest piece that engages and connects with people.”

A great selling point for commercial signage.

gable

Shane graduated from Toronto’s George Brown Signwriting program in 1981. With lettering quill in hand and a box of paint, he started from a humble shop in Creemore, Ontario and, within a few short years, had become a highly sought after Signcrafter. As a Registered Graphic Designer, Shane quickly became known for not only his superb hand crafting skills but also for his novel image consulting and design services, across various mediums: logos, websites, promotional/advertising material, illustration, corporate branding, and showpiece signage. His unique brand is sensory storytelling thru maximum impact, multifaceted visual imagery.

Shane’s work and articles have appeared in international trade publications. National exposure in major Canadian magazines and television. His work, as well as articles, are well respected within the industry. He has hosted design workshops, participants from as far away as Australia. He is retained as key note speaker for branding strategies by municipalities.  Shane Durnford Studios can be found on a variety of platforms, including his new Instagram account.  For more information and other social platforms, check out his website.  Design & Carving workshops are being organized for Summer 2018, more information to come. Email Shane to receive more info and pricing when it becomes available.

Coastal Enterprises offers free samples of Precision Board HDU.  You can also sign up for our monthly blog roundup, which is jam-packed with helpful blogs on people like Shane doing creative and interesting things with Precision Board.  You can also give us a call with your questions at 800-845-0745.  We’d love to hear from you!

Dan Sawatzky’s Time Piece for ISA 2019

Coastal Enterprises, manufacturers of Precision Board HDU, is proud to announce a series of guest blogs written by Dan Sawatzky of Imagination Corporation, which will be posted on the Precision Board Blog at the end of each month. In this month’s entry, Dan Sawatzky talks about getting a head start on next year’s Sign Invitational entry (and smaller piece for the Coastal Enterprises ISA booth!) made from steel, plywood and 30 lb. Precision Board HDU.

sawatzky

I strongly feel that there needs to be a lot more creativity in the sign industry and believe the Sign Invitational contest is a great way to encourage this and hopefully inspire others. Next year’s contest will have a theme of ‘TIME’ with two categories…one with the same build envelope as in the past 2 x 2 x 6 ft.) and a smaller, wall-mounted dimensional version which will measure 3 x 3 ft. max.

Movement, lighting, and other effects are allowed. Contestants may have their name/shop name on the piece. No other sponsor IDs are permitted. Each contestant must transport their piece to the 2019 International Sign Association Sign EXPO to be held in Las Vegas, Nevada. They must also attend the show.

To be considered for the Sign Invitational or for more information, visit their website.

sawatzky

Pro tip: One of the ‘secrets’ to my success is the many samples we display in our studio. More than one hundred and fifty elaborate samples line the walls. These samples showcase the magic we are capable of better than I could ever explain to my customers. These samples are an important investment in our future success.

With the theme determined for next year’s event and the clock ticking it there is no time to waste.

I’ve long known that no matter the creative project it will always take longer than I think. Things will go awry, and I’ll get better ideas along the way. I know our schedule will get busy as well. The solution is to start work immediately and then as I find time along the way I’ll work on the piece a little at a time. This isn’t a billable project and so it needs to fit around our regular work.

sawatzky

I did my first sketches of next year’s entry on the plane ride home from this year’s event in Orlando, Florida. I worked on ideas for the large project first. These rough sketches informed my presentation concepts when I got back to my studio. Once I had the idea and basics nailed, it was time to begin cutting and welding up some steel. I used EnRoute Software to design the files. Then our MultiCam CNC plasma cutter made short work out of cutting the ten-gauge steel to size. An hour of welding and grinding made it ready to build on. I then bent the structural tubing and welded it to the frame. Smaller structural elements for various components such as post, railings and signs were then welded to this frame. After that, I fastened on some flexible 1/4” plywood. From here I’ll rout various architectural details such as windows, doors, trim, signs and other components. These will be glued into place. Then I’ll sculpt in the detail.

I’ll be doing a second piece to enter in the smaller category which will be showcased in the Coastal Enterprises booth at the trade show. They have been a proud sponsor of the Sign Invitational since its inception.

I wanted this piece to relate directly to the first. I decided to build a large steam powered clock. Only I’d take a slightly different tack and so I designed the piece to view the clock from the inside rather than from the front.

I did the concept design first, then used this drawing as a basis for the vector version I designed in EnRoute. With the cutting file in hand it was time to route some 30 lb Precision Board. It took a full sheet of 1.5″ material and a second sheet of 1” thick board to create the files. I cut the clock structure first. Then while the gear file was being routed I assembled those pieces.

There are of course many more fun details to be added as I build which will be revealed in a future post. Stay tuned…

I encourage as many as possible to consider entering a piece of their own in the Sign Invitational. For more information, visit their website.

Sawatzky’s Imagination Corporation is a small family company that specializes in the design and creation of dimensional signs and environments. They tackle projects of any size from small signs to entire theme parks. Their work has garnered numerous national and international awards.

Dan Sawatzky is best described as a creative force and visual storyteller extraordinaire. His art career spans almost fifty years of magic. Dan’s passion is to design and create imaginative places that take people from the normal world to a setting of delight and wonder.

You can get free samples of Precision Board HDU, request a quote, and sign up for the monthly Blog Roundup from Coastal Enterprises.