Blogs
The Method Part II – Demolding the Parts
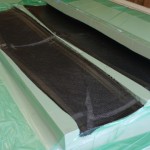
Following up on my previous post on my method of making high quality, re-usable tooling with CNC machined foam and Stretchelon bagging film , here’s how things tend to go on the demold side. First, turn off the pumps, and then remove all the secondary fabrics/films that are bagging the part: I’ve left the peel ply on here, because the parts are still pretty darn soft, but everything else has gone into the trash. Now, simply get some air underneath the layer of Stretchelon covering the mold, and then pull the parts up, along with the film: Now, just simply peel the Stretchelon off the parts – if you’ve used mold release, it should come off very easily more or less in one piece: Presto! And the molds are totally unharmed – same as they were when we started. Here’s a closeup of the surface texture of the finished part: Yes, a bit of texture, but like I said before, a few swipes with some 80 grit to prepare for primer and the texture just vanishes. Or, if you really want a smoother texture, just get more dense tooling foam.
Mighty Moose
As well as the work we are doing on the house we are keeping busy in the shop on customer projects as well. A recent addition to the list of upcoming projects looks to be a fun one! A friend of mine owns a small ice-cream parlor on a very busy street… actually less than a block from our place.
Jigsaw delight
It is not often I use our MultiCam to merely cut pieces. With the new house now in progress it will get pressed into service to cut shapes more often than it has in the past. The first task is to cut the window bucks or forms
Creating High Quality, Reusable Molds with CNC Machined Foam and Stretchelon Bagging Film – aka “The Method”
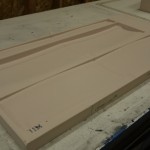
This post is really the culmination of a few years of research, research that I’ve decided to set loose into the world. We call this “The Method,” or sometimes “The Stretchelon Trick” and it’s my primary method of creating tooling for composite parts these days. As an example, I’m using the Giles 200 gear leg fairings that I describe in depth in this post here. You might read that post and think “well that’s all well and good, but what the heck are you going to make those molds out of that’s cost effective?” The answer is medium density polyurethane tooling foam, normally 15 lb. density foam. For these gear legs, the depth of the mold is about 1.5″, so I used 2″ thick foam. A 2″X48″X96″ block of tooling foam is about $500, and this particular mold is about 23″X40″, so the material cost is a fairly small fraction of that. Here’s the machined foam of the gear leg fairings, cut yesterday: Okay, granted, it’s a bit hard with the light here to really see what’s going on, but if you look at the post I link to above, you’ll see this is just the CNC machined version of the gear leg tooling. Since one of these molds is two part, the next step is to join the two parts together: We usually join them together with some fast setting epoxy and then drive some dowels into them for good measure. Now at this point you’re probably thinking “well that’s nice and all, but now you’ve gotta spray some sort of primer/sealer onto that thing, and hand finish it.” But, you would be wrong. You see, I hate sanding. Actually, that’s not really true, I like doing body work, but I hate sanding when there’s no point to it. And now let me show you why there’s no point to it: This, my friends, is the heart of “The Method.” The green stuff over the mold is an elastic vacuum bagging material called Stretchelon . Stretchelon is a high elongation vacuum bagging film. I hate dealing with bagging tape, and so I’ve routered channels into my work table here, coated them with shelf paper and then used hardware store screen door spline to create the seal. This method works quite well, but you can just as easily make a tube out of the Stretchelon and put the mold in the tube. I pull my vacuum for the mold from the bottom of the table. The mold is sitting on a piece of breather so that the air gets evacuated from all around the mold. The slight porosity of the foam does wonders to allow the air to travel to the edge of the foam. Closeup, it’s looks like this: The Stretchelon pulls down right onto the foam, sealing it for use. Pretty cool huh? Yes, there is a bit of a texture to the mold. If you want a smoother mold, just buy higher density foam. But what I’ve found is that since the first thing I do when I go to prime a part is to scuff it up, that texture simply vanishes with a few strokes of a sanding block. The final thing to do is put some mold release on it – the film is polyurethane and so epoxy will stick to it. I’ve used Frekote in the past, but I like to use another Airtech product called Safelease 20L . It can be dispensed from one of those hand squeeze spray bottles you get at the hardware store, so I like the fact I’m not using a bunch of aerosol cans. And it works, so that’s nice. Anyhow, once you spray your mold down with some release and then wipe off the excess, this mold is pretty much like any other – yes, it’s slightly more ding prone than standard hard tooling. If you want to make lots of parts (let’s say, more than 10) then I would simply go with a more dense foam, say 25 lbs. If you get any dings, you can simply patch them with spackle. When I first starting doing this, I was really concerned about mold wear, but frankly it just hasn’t been a real problem. Some of my molds have been used 10-12 times now, and for the most part they look just like they did the first time. So now, it’s just a matter of laying up the laminate, in this case 3 layers of 5.7 oz carbon: And then, you vacuum bag another layer of Stretchelon (or regular bagging film) over on top of the part: Your standard peel ply/perf/breather fabrics are on top of the carbon. The vacuum for the top bag comes from a standard bag tap. So we’ve got two separate pumps running here – one for the mold, and one for the part. They’re both around 25-26″ of mercury. You’ll get a few more inches of mercury with a bag tube made with bagging tape, but the cost and labor savings of this whole screen spline method are nice
VariEze N388DT – Fuselage Refinishing
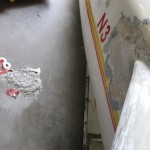
I’m back from vacation! Had a very nice time, but I’m happy to be back in the States, and working away on some cool projects. James has been working on scraping all the old paint and fill off of the VariEze. The paint is Imron, which has been holding up quite nicely, but the fill used by the builder was Featherfill, which in some spots is practically exploding off the airframe. It’s only further cementing my opinion that polyester based products have no place whatsoever on aircraft. It’s not a matter of if they break down, only when. Here’s some pics: Do you know what tomorrow is? It’s the one year anniversary of the launch of this blog! And I’m cooking up a very special post to celebrate the occasion! Stay tuned…..
Terps Racing 2012 Public Unveiling This Saturday!
This weekend on April 28th, the University of Maryland SAE team, Terps Racing, will be unveiling their car for the 2012 Formula SAE season. Formula SAE is a massive international student design competition that has been in place since 1979. The concept behind SAE is...
Pleasing Signs From Paducah: Keeping The Hand-carved Tradition Alive
Rob Estes, of Brushstroke Signs in Paducah KY, wants everyone to know that hand carving is still alive! Rob has been making signs since 1985 and has always been an avid hand carver and hand painter. He’s been using Precision Board Plus for years for his dimensional...
Open the big magic doors!
Today was a busy day in the shop. My winter students are now full time in the shop and our son Peter has joined us for the summer as well
innotech
We’ve chosen to go with INNOTECH windows and doors for our new house. These windows are the among the greenest out there and with triple glazing on the north/road side of the house they should work exceptionally well