Blogs
Well hung
Once the pieces had all been routed it was time to the glue up. We used the routed slots in the center of the sign as a jig to tack up the steel frames, then pulled them out and did the final welding. Some steel eye bolts were also welded to the top of the frame. A 5/8″ steel bar was welded to the post side of the sign as well. The sign was hung from the matching eye bolts on the structural steel post
All aboard!
One of the signs that I have been looking forward to building is the one for the Railroad. It features Pike, the Gruffle engineer in the cab of his engine. The sign will be about 44″ tall nd will hang from a mast similar to the other signs. I started with a quick hand trace of the main sign elements
A peek at the bigger picture
We are now three months (of eleven) into the Skallywag Bay Adventure Park project. The shop is full of projects on the go and out in the parking lot there are enough finished pieces to fill three forty foot shipping containers with enough pieces still left to begin loading two more containers. Forty-one pieces are finished.
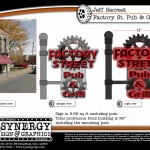
Factory Street Pub and Grill. Part 1
Here it is. Factory Street Pub and Grill. This will be the first post in a series on how we fabricate signs here at Synergy. We’ll be walking you through the shop designs, welding, carving, lighting, painting, and install on this project. We took this design in front of a historical district review panel yesterday and everyone was floored
Everyone loves tools!
Cookie’s tool set was a whole lot of fun to create. Since the last post on the project we’ve hand brushed three coats of base colors on (all acrylic house paints). Then the glazes went on the wood, starting with the lightest and working towards the darkest. After the piece is covered the glaze is gently wiped off leaving excess in the crevices and deeper portions of the texture.
Pieces of Eight mounting
The three pieces of the Pieces of 8 sign that were routed from 30lb Precision Board were laminated over a welded steel frame sandwiching the structure inside. The two protruding steel legs were then welded to the steel structure of the post. Once the glue had set (overnight) I used our air powered die grinder to quickly add some woodgrain texture to the sides of the sign. I then welded the sculpture of Tupper in the crow’s nest to the top
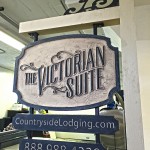
Ohio Armament and the Victorian Suite
Today we delivered this little beauty. On this project we had a chance to weld, carve, paint, glaze, and fabricate wood posts. It’s fun to look back and see how far we have come in both the machinery dept. and in our overall capabilities
Special Thanks to all of our new Partners and Sponsors.
We signed on with another Partner today. Modern Masters has been gracious enough to supply us all of the paints for our upcoming gear projects. We will be building 2 gears for Multicam and 1 gear for Coastal Enterprises . All three gears will be getting painted with Modern Masters Metallics and reactive paints. Modern Masters will also be featuring us in their ad materials throughout the coming year, so keep an eye out for us! We would like to send out a formal thanks to Robert and Denis @ Multicam, Greg @ Modern Masters, and Kellie @ Coastal Enterprises for acknowledging our work and helping us raise the bar in the sign industry
Combining hand and machine work
Creating files in EnRoute and routing them on the MultiCam is a huge timesaver. By using bitmaps I can create wonderful textures to add dimension to our projects. But the fact is that after the parts are machines we are only about half way to finish on most of our dimensional projects. Cookie’s utensil rack is a good example


